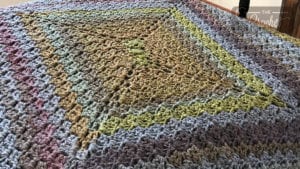
Crochet Corner to Corner Rectangle from Middle
The Corner to Corner Rectangle from the middle took me several tries to get the blanket to lay flat. The biggest problem with the R & D of this design was getting the middle to cooperate with the remaining afghan. I released after a few attempts I cannot go in a continuous revolution to get the look. So at the end of each round, I had to turn and go back in the other direction.
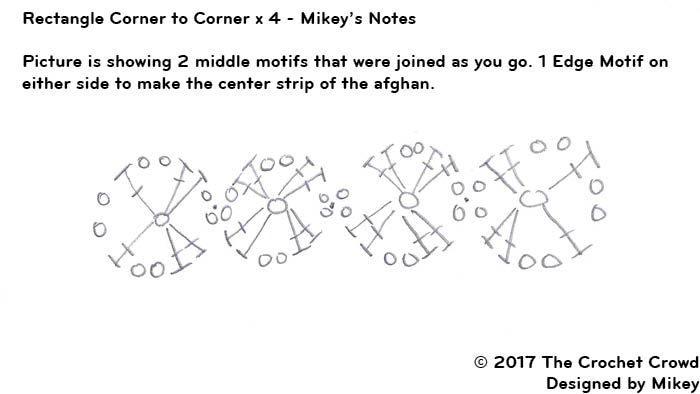
I eventually figured out that the center needs to be made of joining motifs to get it to work out. Don't let that realization fool you thinking it's hard. In fact, it makes it easier if you want to extend your rectangles in one direction. So there are 2 types of motifs to use. You need a different motif between the end motifs. So for all middle motifs, you will do one design. For the ends, you will apply the other motifs to both ends to form the center of your blanket.
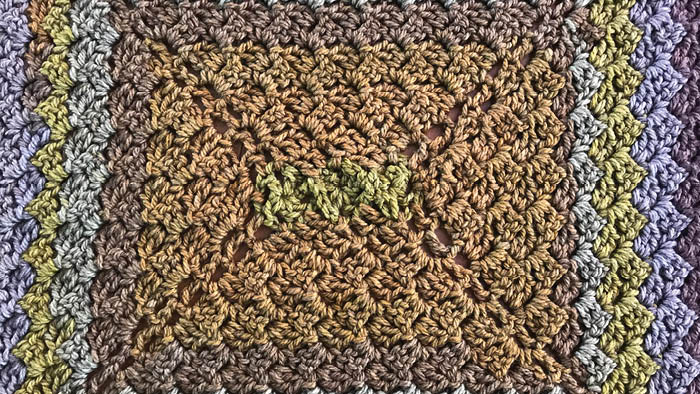
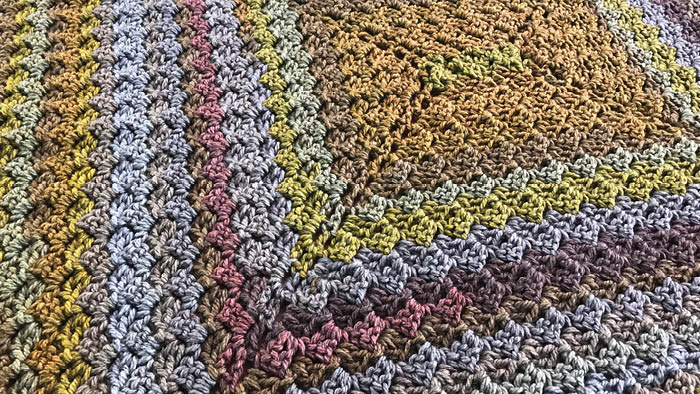
If you look at the first close up photo below, you will see the 3 motifs I used as the center. It's in the green colour.
Afghan below is 43" x 40" using Caron Tea Cakes. I used 7 Caron Tea Cakes and in different shades of Caron Tea Cakes. I used each ball completely. The order of the colours used are as follows:
- Maple Matcha
- Ginger Spice
- English Breakfast
- Maple Matcha
- Maple Matcha
- Maple Matcha
- Maple Matcha
Close Up Photo
Let's Build the Middle
Lets make the first middle one (not an edge section.
- Ch 4, 1 dc in 4th ch from hook. *Ch 2, 2 dc in same 4th ch from hook, Repeat * 2 times. Ch 2, join with top chain. Fasten off.
All Middle Joining Motifs
You will join the next motif directly to the one you just made. You will do this for all middles.
- Ch 4, 1 dc in 4th ch from hook. *Ch 2, 2 dc in same 4th ch from hook, Repeat * 1 time. Ch 1, sl st to already made motif in ch-2 space, ch 1, 2 dc in same 4th ch from hook. 2 dc in same 4th chain from hook, ch 2, join with top chain. Fasten off.
Keep making more middles to join to extend out the afghan in a rectangle format. The sample above has 1 middle with 1 edge motif on either side.
End Motifs
Once you are satisfied with the middle, you have to add on a special motif to ensure the stitches line up properly on each corner of the afghan. It's important to where you join this motif.
- Ch 4, 1 dc in 4th ch from hook. Ch 1, sl st to already made middle motif in ch-2 space, ch 1, 2 dc in same 4th ch from hook. 1 dc in 4th ch from hook, ch 2, dc 4th chain from hook, ch 2. Join with top chain. Fasten off.
Do this for the other side of the middle motif strip.
How Many Motifs to Make
The length of the strip is verses the width is your indication on how it will grow out. It's directly related to each other.
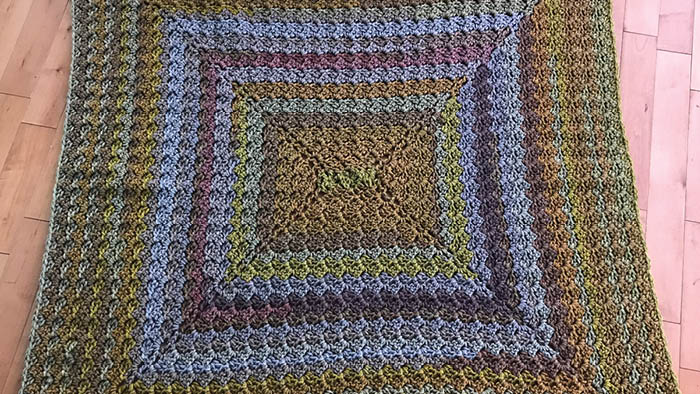
The sample seen is 43" x 40". The center motifs measured 5" long x 2". So the difference between is 3". So as it got bigger, it maintained a different of 3" longer than the width.
Tutorial
Self Striping Yarn Issue
If using self striping yarn, you will see 1 corner not line up like the other 3. This corner, shown below is the turning spot at the end of each row. So the colours don't continue around like the other 3 corners.

See the upper right corner. That is the turning spot. You see the other 3 colours the self striping yarn continues around each corner.
Let's do our first rotation around the center strip that you have created. This is important to get us started for the remaining of the blanket. Let me show you my diagrams I made to help you visualize what you are going to do.
Follow the Diagrams to Make your Rotates Around the Center Strip
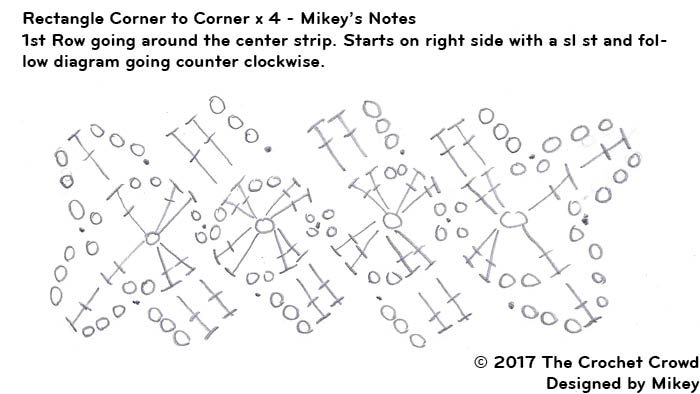
Crochet Diagram 1
With the center strip made. Choose the ch-2 space on the very end of the strip shown on the right hand side. Then follow diagram in a counter clock-wise around. At the end of the row, you will turn your work and go back in the direction you just came from.
Pay extra attend to the 4 corners that are shown, Ch 3, dc in the next dc, ch 3 and sl st to the next ch-2 space. Your corners will always be the same look.
Crochet Diagram 2
To start Row 2, you have to slip stitch up the ch-3 chain. As shown on the right. Then you begin this round. Read the diagram in a clock-wise motion.
Continue to watch your corners as you get started. Pay extra attention to your last 2 stitches. You will see 2 dc side by side in a corner. You need to do that in order to have the same look on all 4 corners.

Crochet Diagram 3
To start Row 3, you do exactly as you did in Row 2. The difference is that there are more stitches between the corners to fill in. The corners are still handled in the same manner. Read this diagram counter clock-wise.
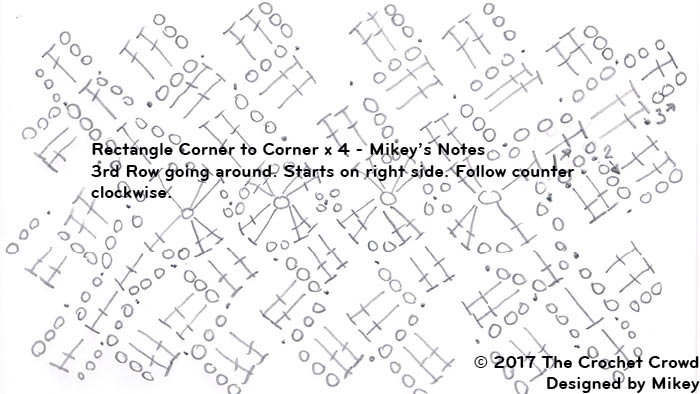
You will continue the pattern as shown in like Row 2 and 3 until you get to your desired size.
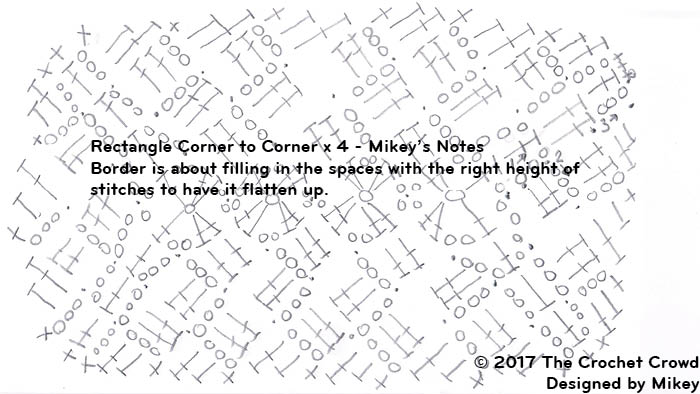
Border
Once you get to your desired size, you should end on Row 3. In the border round, we will get rid of the chevron looking edge and have it flatten up. There is only 1 round required to do this. Read the diagram going counter clock-wise.
Learn to Read Crochet Diagrams
If you want to learn how to read diagrams, we have a tutorial for you.
Dee says
My understanding of a C2C piece is that it is a directional technique that is worked from one corner to opposite corner. And that it is not a stitch by name. Any stitch that can be worked on the diagonal can use the C2C technique. By working these clusters in rounds from the center out, it is a slanted shell or crazy stitch.
Judith Conley says
End motif. Be careful where you join it. OK - can it give me a clue after this admonition WHERE to make this critical join. Is there a video tutorial on this yet? Will there be one?